Bovino Aprotinin Kit Elisa (A5146)

Spese di spedizione
Tempi di consegna
7-10 Giorni lavorativi
Telefono
+1 (314) 370-6046
Lun - Ven, 8:00 - 16:00 AST
E-mail
orders@antibodies.com
Nome
Bovine Aprotinin ELISA Kit
Descrizione
Bovine Aprotinin ELISA Kit is a competitive Enzyme-Linked Immunosorbent Assay (cELISA) designed for the in vitro quantitative determination of bovine Aprotinin in serum, plasma, tissue homogenates, cell lysates, cell culture supernates or other biological fluids.
Tipo di kit
Competitive (quantitative)
Principio di kit
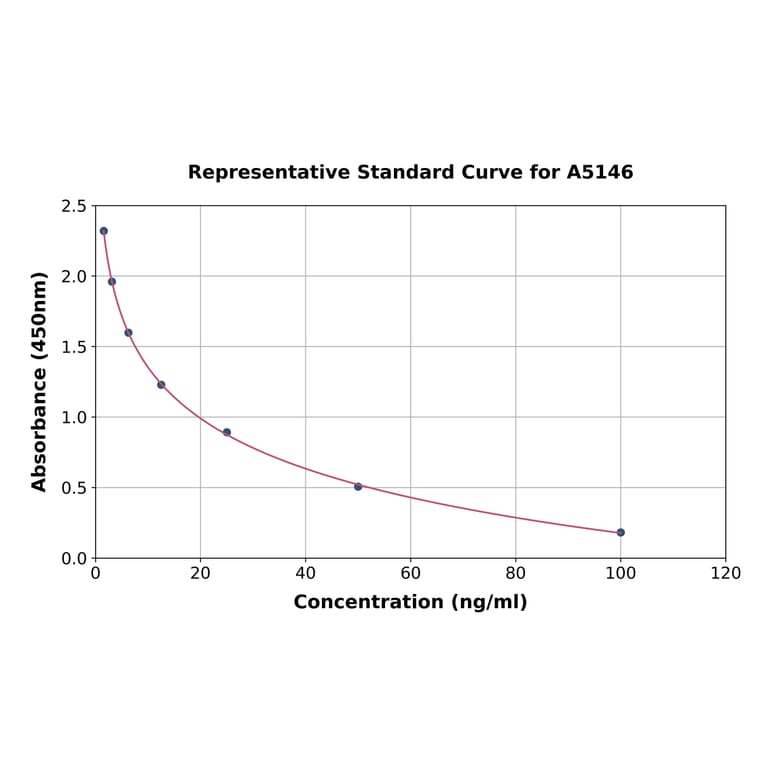
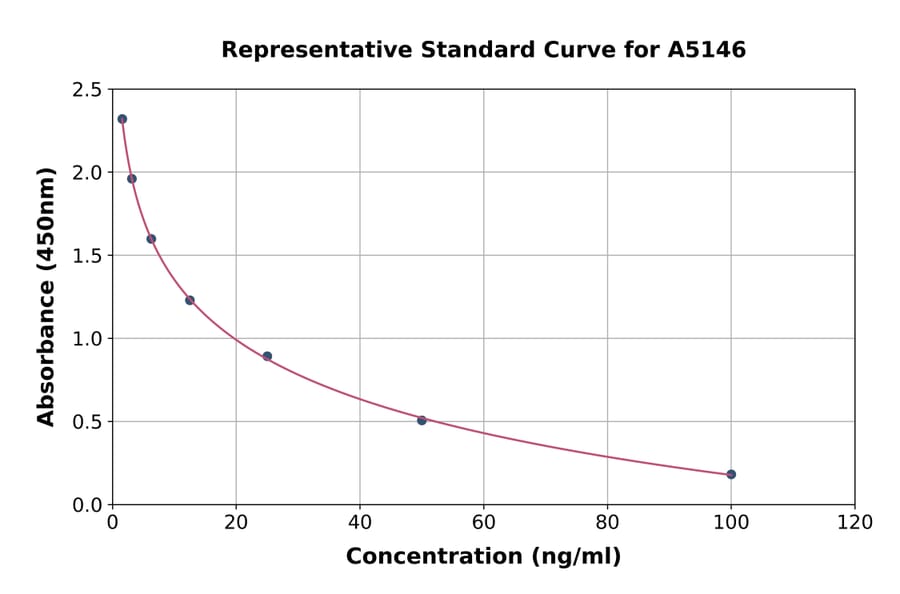
Bovine Aprotinin ELISA Kit (A5146) employs the competitive enzyme immunoassay technique for the quantitative measurement of bovine Aprotinin in serum, plasma, tissue homogenates, cell lysates, cell culture supernates or other biological fluids. The 96-well microtiter plate has been pre-coated with Aprotinin antigen. During the incubation, Aprotinin present in the samples or standards competes with the fixed amount of immobilized Aprotinin for binding sites on the Biotinylated Anti-Aprotinin Antibody. The more Aprotinin present in a sample or standard, the less Biotinylated Anti-Aprotinin Antibody that binds to the plate. Following incubation, unbound Biotinylated Anti-Aprotinin Antibody is removed by washing, and an HRP-Avidin conjugate is added to the wells and the microtiter plate is incubated. Following incubation and washing, TMB substrate solution is then used to visualize the HRP enzymatic reaction by catalysis to produce a blue-coloured product that changes to yellow after addition of acidic stop solution. The density of yellow is inversely proportional to the amount of Aprotinin present in each sample or standard. The concentration of Aprotinin can then be calculated by reading the O.D. absorbance at 450nm in a microplate reader and referring to the standard curve.
Piattaforma
Pre-coated Microplate (12 x 8 well strips)
Tipo di rilevamento
Colourmetric
Instrument
Colorimetric Microplate Reader
Tipo di campione
Serum, plasma, tissue homogenates, cell lysates, cell culture supernates or other biological fluids.
Sensibilità
0.43 ng/ml
Campo di rilevamento
1.56-100 ng/ml
Tempo del kit
2h 30m
Reattività
Bovine
Recovery
Sample Type n Range Average
Serum 5 82% - 102% 92%
EDTA Plasma 5 90% - 100% 95%
Heparin Plasma 5 88% - 100% 94%
Linearity
Sample Type 1:2 1:4 1:8 1:16
Serum (n=5) 86-110% 77-102% 90-96% 84-108%
EDTA Plasma (n=5) 88-100% 90-103% 76-110% 86-93%
Heparin Plasma (n=5) 89-102% 75-106% 94-97% 88-110%
Precision
Intra-assay CV: < 8%, Inter-assay CV: < 10%
Note generali
Information online is representative. Always refer to the Product Manual inside the kit.
Conservazione
Store kit components at +4°C or -20°C as instructed. Do not use past expiration date!
Sinonimi
Basic protease inhibitor, BPI, BPTI, Pancreatic trypsin inhibitor, PTI
Dichiarazione di non responsabilità
Questo prodotto è solo per uso di ricerca. Non è inteso per uso diagnostico o terapeutico.
Kit Components
Item Quantity Storage
Pre-Coated 96 Well Microplate 12 x 8 Well Strips -20°C
Lyopholized Standard 2 Vials -20°C
Detection Solution A 70μl -20°C
Detection Solution B 120µl -20°C
Wash Buffer (30X) 20ml +4°C
Sample Dilution Buffer 45ml -20°C
TMB Substrate 9ml +4°C
Stop Solution 6ml +4°C
Plate Sealers 5 Adhesive Strips -
Required Materials
The following materials are not included in the kit, but are required to run this assay:
  • Microplate reader capable of measuring absorbance at 450nm ± 10nm.
  • Squirt bottle, multichannel pipette reservoir, or automated microplate washer.
  • Graph paper or computer software capable of generating logarithmic functions.
  • Test tubes and Eppendorf tubes to prepare standards and samples.
  • Multi- and single-channel pipettes and sterile pipette tips.
  • Deionized or distilled water.
  • Absorbent paper towels.
  • 37°C incubator.
Important Notes
  • Sample concentrations should be estimated before being used in the assay and a proper dilution factor should be selected to make the diluted target protein concentration fall in the optimal detection range of this kit.
  • Hemolysis can greatly impact the validity of test results. Take care to minimize hemolysis.
  • Samples should be brought to room temperature before starting the assay.
Bring all reagents and samples to room temperature before use.
We recommend that all standards and samples be assayed in duplicate.
Step 1
Prepare all reagents, samples, and working standards as directed in the previous sections.
Step 2
Determine the number of microplate strips required for the assay and insert them into the plate frame. Unused strips should be stored in a foil pouch at -20°C.
Step 3
Add 50μl of standard solutions to the standard wells. Note: A plate layout is provided to record standards and samples assayed.
Step 4
Add 50μl of samples to the sample wells.
Step 5
Immediately add 50μl of working Detection Solution A to each well and shake the plate gently. Using a microplate shaker is recommended.
Step 6
Cover with a new adhesive plate sealer and incubate at 37°C for 60 minutes.
Step 7
Remove the plate sealer, aspirate the liquid from the plate, and wash the plate three times with Wash Buffer. Soak wells with 300μl of Wash Buffer for 1-2 minutes each time. Note: Complete removal of liquid at each step is essential to good performance. After the last wash, remove any remaining Wash Buffer by aspirating or decanting. Blot the plate onto paper towels or other absorbent material. Do not let the wells dry completely at any time!
Step 8
Add 100μl of working Detection Solution B to each well.
Step 9
Cover with a new adhesive plate sealer and incubate at 37°C for 60 minutes.
Step 10
Remove the plate sealer, aspirate the liquid from the plate, and wash the plate five times with Wash Buffer. Soak wells with 300μl of Wash Buffer for 1-2 minutes each time.
Step 11
Add 90μl of TMB Substrate to each well. Cover with a new plate sealer and incubate at 37°C in the dark for 15-25 minutes (do not exceed 30 minutes). Note: This incubation time is for reference only, the optimal reaction time should be determined by the end-user and can be shortened or extended according to the actual color change. The reaction may be terminated when a gradient is apparent in the standard wells.
Step 12
Add 50μl of Stop Solution to each well. The color in the wells should change from blue to yellow immediately. Note: If the color in the wells is green or the color change does not appear uniform, gently tap the plate to ensure thorough mixing.
Step 13
Determine the optical density (O.D. value) of each well immediately using a microplate reader set to 450 nm.
Inizio pagina